Roadie
- Nov 1, 2017
- 9 min read

Hobbyist musicians need better control over how they sound during performances because inconsistencies in sound lead to decreased confidence in their performance.
HCDE 318, Introduction to User-Centered Design, guided us through a 10-week design process from user research to high-fidelity mock-ups. This is a document of our process. This project proposes a hypothetical solution and relies on future technologies such as digital mixing consoles and advanced smartphone microphones.
RESEARCH FINDINGS
Our team interviewed hobbyist musicians which we defined as people who play music in their spare time and don’t make a living by performing, but occasionally play at small venues. We talked to them about their performance and practice processes in order to gain a better understanding of their characteristics, problems, and desires.
We interviewed six people ranging from 18 to 24 years old and found our users are passionate about their musical hobbies, practice at least once a week in various locations ranging from classrooms to their homes, and they often encounter technical issues during performances. We synthesized this information and created personas as representations of the people we interviewed.
Additionally, we did a competitive analysis for four different existing products on the market that are targeted towards hobbyist musicians. We found that there are a wide range of music applications available, but most are for beginners and are either educational apps or apps that facilitate music writing.
Interviews conducted by Reine Abubakar, Pari Gabriel, Sierramatice Karras, Arsh Saroya
PERSONAS


With information gathered from our user interviews, we created representations of our target demographic and their pain points. We used these personas to give an identity to our users and to determine what they need out of our product. Hobbyist musicians are our primary stakeholder, so it was important that we had a clear understanding of who they are in an empathetic way. These personas were based on our research findings and are a combination of the most salient traits of our users. From these traits, we created design requirements to address the highlighted needs. Through creating the personas we learned how to create empathy with storytelling.
Content by Reine Abubakar, Pari Gabriel, Sierramatice Karras, Arsh Saroya Visual Design by Pari Gabriel
USER JOURNEY MAP

Based on the information gathered during our user interviews and the personas we created, we built our user’s journey map to pinpoint exact moments of frustration and anxiety and how these affect their performance. This provided us with clarity on where and when our solution should come into play. We made the map to get a better idea of the process the user goes through, when they encounter issues, when opportunities present themselves to address these issues, and to ask questions about what they need to be successful. We found that one of the main issues was the user’s steadily declining confidence throughout the journey. The criteria for what a user needs to be successful translates into the design requirements which ultimately set the stage for our solution’s features.
Content by Reine Abubakar, Pari Gabriel, Sierramatice Karras, Arsh Saroya Visual Design by Arsh Saroya
DESIGN REQUIREMENTS
Based on the knowledge that our users were losing confidence during live performances, we wanted to design a solution that would improve their performance experience. After choosing to focus on improving sound balance for performers, we had to decide on the most important requirements of our solution. Looking back on the interviews we conducted, personas, and user journey map, we aggregated the data to determine our user's needs. This data led us to conclude that our solution had to:
Suggest settings for artist type and venue based on other users’ data
Interface easily with mixing consoles
Save user’s settings based on their location and instrument arrangement
Be easy to use regardless of technical knowledge
Allow users to input what equipment is available at the venue
These design requirements created a baseline for the functionalities we incorporated in our low-fidelity prototypes.
Content by Reine Abubakar, Pari Gabriel, Sierramatice Karras, Arsh Saroya
STORYBOARDS
The storyboards were explorations of how different technological solutions could address our problem statement. A variety of solutions were proposed, ranging from applications, to wearables, to an independent device that would plug into the mixing console. As a team, we were able to evaluate which ideas may best address our design requirements and would be the most accessible for our users. Our individual iterations helped us draw inspiration from a number of ideas by branching out to explore design solutions and then focusing in on the most effective and feasible products.
After much discussion, we decided an application would best fit our user requirements. It would be the simplest and easiest and most financial accessible technology for a hobbyist musician to use. After deciding on a mobile application, we were able to begin creating the information architecture and underlying structure of our solution.
Content by Reine Abubakar, Pari Gabriel, Sierramatice Karras, Arsh Saroya
INFORMATION ARCHITECTURE

Visual Design by Arsh Saroya
Our information architecture shows the simplicity of our solution and how a user’s limited options can create a non-invasive experience and allow them to focus on performing. Creating this diagram helped us determine the pathways and general layout of our application.

Visual Design by Sierramatice Karras, Pari Gabriel
We created additional documentation about our application’s hypothetical machine learning process. Roadie’s machine learning algorithm aggregates band and venue info, which has been inputted by the user and venues, into the algorithm’s knowledge. It then iterates upon this knowledge by listening to soundcheck through the phone’s microphone and ratings provided by users. With every repeat of this cycle, Roadie’s knowledge becomes more accurate and allows the application to create better and better sound settings.
Once we had our flow for how the user would interact with the application, we had the foundation for creating the individual screens. We heavily referenced this visualization while creating our paper prototype.
Content by Reine Abubakar, Pari Gabriel, Sierramatice Karras, Arsh Saroya
PAPER PROTOTYPE

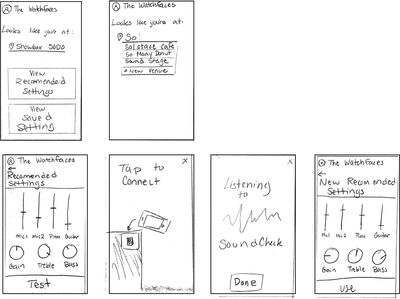

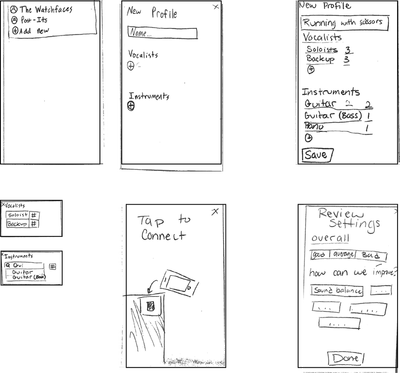
Based on our information architecture, which outlined all the possible paths our users could take, we sketched out the screens that make up our application. The paper prototypes were a low-fidelity mockup of three important task paths in our product which allowed us to test out design decisions in a low-stakes environment. The paper prototypes were our first venture into receiving feedback on our design solution from users and people outside of our class. We used the paper prototypes to get our design decisions on paper and ask users what their honest thoughts were on the application concept and features.
Content by Reine Abubakar, Pari Gabriel, Sierramatice Karras, Arsh Saroya
USABILITY TESTING
We tested our paper prototype with users to see where we might need to improve. This was a quick and cheap low-fidelity method to see our ideas in the real world. We used the findings of this evaluation to modify and improve our design before creating wireframes.
Our results:
Users wanted to be able to test their settings multiple times
The “Listening to Sound Check” page did not prompt the user to complete an action.
Confusion between “View Recommended Settings” and “View Saved Settings”
To address these findings we made a variety of changes to our design before the wireframe stage. We added a second button to our settings page, allowing the user to go through the sound check process multiple times or skip right to the performance stage. We also changed design copy in the "Listening to Sound Check" page which users found confusing or ambiguous to prompt the musician users to begin their sound check. To further highlight our solution's artificial intelligence aspect, we changed "View Recommended Settings" to "Generate Settings", which gives the user a hint that these settings are customized for them. "View Saved Settings" was changed to "Past Settings" to create less confusion and parallels ambiguity between the two buttons.
Content by Reine Abubakar, Pari Gabriel, Sierramatice Karras, Arsh Saroya
ANNOTATED WIREFRAMES


After conducting usability testing with our paper prototypes, we took the feedback and created annotated wireframes. These were meant to be clean low-fidelity mockups of every screen of our mobile application to illustrate what our solution looks like on a phone. Using the wireframes, we created key path scenarios to illustrate the most important flows in our application. These allowed us to think about transitions and necessary on-boarding features for our users. We received critiques on our wireframes from peers in our class and we used their comments and concerns to further refine the interface for our high-fidelity mockups.
Content by Reine Abubakar, Pari Gabriel, Sierramatice Karras, Arsh Saroya
HIGH FIDELITY MOCK-UPS
In creating the final visual style, we had to think of the context of use for our application. Because our user would generally be using this in a dimly lit concert venue, we made the base color a dark grey. This makes the app less distracting to other concert-goers and easier on the eyes of the user. Yellow was chosen as the accent color because of its association with happiness, energy, and comfort while still being interesting and highly contrasting with our primary color. Many popular music applications, like Spotify and GarageBand, have a dark primary color with a bright accent color, a trait we wanted to include to further the user’s sense of familiarity.

Home Screen
Features include: automatically generated and editable location, generated settings using the Roadie algorithm, a history of past settings, and view/edit/add profiles.
We had a lot of conflict regarding the copy on each of the buttons, whether they should say “View Recommended Settings” and “View Past Settings”. In the end, we chose “Generate Settings” to show these were custom sound settings made for the user. “View Past Settings” became simply “Past Settings” rather than “History”. We found “History” can represent view-only content, while we wanted this feature to afford the settings being used again if the user is at a venue they have played at before.

Settings
Features include: adjustments for sound settings including master volume for each instrument/vocalist, master controls for bass, treble, and total volume, as well as a test button.
To create familiarity, we took cues from Digital Audio Workstations and other music applications that hobbyist musicians are familiar with. Because this application is meant to be a more simple version of a mixing console, something that is largely foreign to the user, we strived to make it approachable and familiar so there would be a minimal onboarding process. This screen affords the user making their own adjustments if they know exactly what they want, otherwise they can rely on Roadie to suggest settings and learn from each iteration of the test feature.

Review
Features include: star rating system, category based feedback, and free response “Other” feedback option.
To organize this feedback system, we took inspiration from the watchOS Settings page. We combined elements from that screen with a pop-up to allow the user to give specific feedback for each instrument and vocalist type. We implemented notification-style numbers to indicate how much feedback the user gave for each category that was rated. The star system allows the user to give an overall rating for the sound settings during the performance.

Sound Check
Features include: animation to show AI is currently listening to performance, button to move onto another iteration of the sound settings, ability to go back and edit sound settings manually.
The high fidelity mockups allowed us to bring a product to life that we have spent 10 weeks researching, creating, and refining. While the wireframes set the stage for our high fidelity mockups, they did not prepare us for is how to introduce our machine learning algorithm to the user and the many small design decisions surrounding color choices and visual style.
Through creating these mockups and presenting them to industry professionals we learned that context is important. Whether we focus on the physical context of use for the application, or the user’s context surrounding their knowledge of mixing consoles, it is of the utmost importance to empathize and understand where and with what knowledge a user is interacting with your product.
Content by Reine Abubakar, Pari Gabriel, Sierramatice Karras, Arsh Saroya Visual Design by Pari Gabriel, Arsh Saroya
REFLECTION
The most challenging part of this project was the difficulty in simplifying such a complex process. Mixing consoles are often complicated devices that only professionals are able to manipulate, so we had to find a way to translate the physical features and abilities of mixing consoles into a simple application that was usable by anybody, regardless of their technical knowledge. We had to make difficult decisions on how simplistic and abstract we wanted our displays and interactions to be.
As we worked on our solution, we found that the easiest way to display soundboard settings was to implement an interface that imitated a mixing console without being too literal in our application of the features. While creating these pages, our team was surprised to find that some of the real-life soundboard features, such as knobs, did not translate into an intuitive interaction on the screen. If we had more time, our team would have conducted more user interviews to gain a broader perspective of the hobbyist musician practice and performance experiences. Additionally, we would have liked to conduct usability testing on our high fidelity prototypes by asking our interviewees to complete the salient tasks of our application. This would have allowed us to further refine our designs.
The Team
Reine Abubakar
Pari Gabriel
parigabriel.com parijgabriel@gmail.com
Sierramatice Karras
cckarras.wixsite.com karras@uw.edu
Arsh Saroya
arshsaroya.com asaroya@uw.edu
See the full informational site at: roadieteam.weebly.com
Site Design by Pari Gabriel, Sierramatice Karras
Comments